1. Navigate to Sender Configuration Settings
- Log in to your GTR account.
- Go to Settings → Sender Configuration.
- By default standard email configuration will be selected and you will see fields for From Name and From Address.
2. Sender Configuration
- Fill in both From Name and From Address.
- From Name (e.g., Get Solar Co.)
- From Address (e.g., info@getsolarco.com)
- The Send Verification button will become active once both fields are valid.
- Click Send Verification to send a verification email to the address you entered.
- Check your email, and click the button “Verify” to continue your DNS Authentication.
From Name: The name you want to appear in your recipients’ inbox.
Example: Get Solar Co.
From Address: The email address you want to send from.
Example: info@getsolarco.com
Note: Until your email is verified and DNS is configured, all emails will be sent from donotreply@getthereferral.com.
Understanding the Verification Status Icon
Once the verification email has been sent, you’ll see an icon indicating your verification status next to the From Address field:
|
Icon |
Status |
|
Gray X |
Unverified |
|
Green Check |
Verified |
If the email has already been verified but not yet fully authenticated, the button will show Resend Verification. Clicking it will resend the verification email.
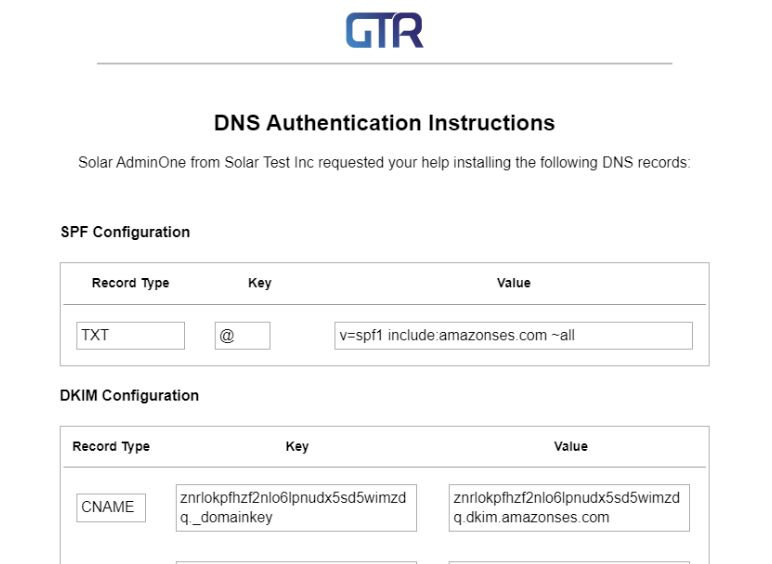
3. DNS Authentication
Once the email address has been verified, the DNS Authentication will populate the SPF and DKIM fields that will need to be added to your DNS provider.
- Copy each record exactly as shown
- Log in to your DNS provider (e.g., GoDaddy, Cloudflare, Bluehost)
- Add the SPF and DKIM entries
- After the records are added to your DNS provider, return to the dashboard and click Verify to complete the setup.
- Once the DNS configuration is completed, the status changes to Verified.
Don’t manage your own DNS?
If you do not have access to your DNS provider, click the Send Instructions button to email these steps to your IT team. This email will contain the DNS records that need to be added to your DNS provider.
4. Test Email
After DNS verification is complete, you can confirm everything is working.
- Fill out the email address field and click the Send Email button.
- Check your inbox for a message with the subject line: "Test email from GTR"
- When successful, you will see a message above the Enter Email field “Email verification is complete. All system and marketing emails to your users will be sent from youraddress@yourdomain.com”
Until Verification Is Complete
If any part of the setup is incomplete (email verification or DNS authentication):
- Transactional emails will continue to be sent from donotreply@getthereferral.com
- Only 100 Referral Boost emails will be allowed to be sent daily
Once both are verified:
- All transactional and marketing emails will be sent from your configured From Name and From Address